Blog

 RSS Feed

  1. Lens Chromatic Arberration is an optical fault in a lens that creates a less than perfect image. Below you will find the cause and ways to correct the effect.


    Chromatic aberration, also known as “color fringing”, is a common optical problem that occurs when a lens is either unable to bring all wavelengths of color to the same focal plane, and/or when wavelengths of color are focused at different positions in the focal plane.

    Chromatic aberration is caused by lens dispersion, with different colors of light travelling at different speeds while passing through a lens. As a result, the image can look blurred or noticeable colored edges (red, green, blue, yellow, purple, magenta) can appear around objects, especially in high-contrast situations.


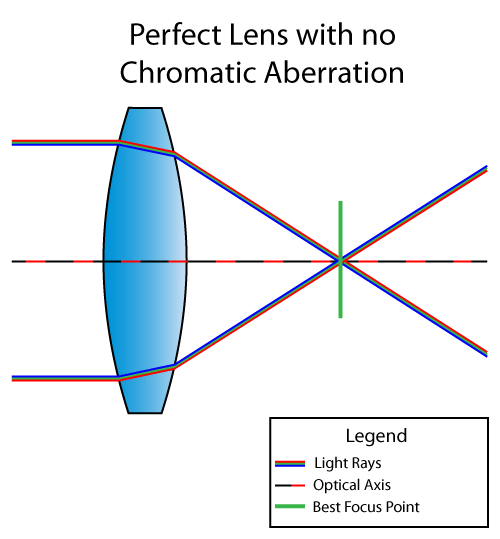
    A perfect lens would focus all wavelengths into a single focal point, where the best focus with the “circle of least confusion” is located, as shown below:

    Corrected-Chromatic-Aberration

    In reality, the refractive index for each wavelength is different in lenses, which causes two types of Chromatic Aberration – Longitudinal Chromatic Aberration and Lateral Chromatic Aberration.

    Longitudinal Chromatic Aberration
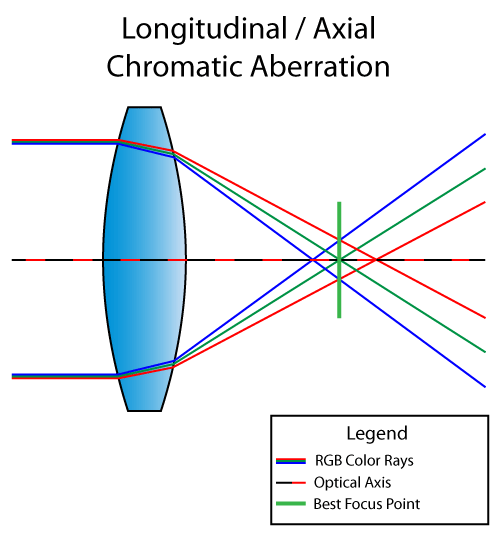
    Longitudinal Chromatic Aberration, also known as “LoCA” or “bokeh fringing”, occurs when different wavelengths of color do not converge at the same point after passing through a lens, as illustrated below:

    Longitudinal-Chromatic-Aberration

    Lenses with Longitudinal Chromatic Aberration problems can show fringing around objects throughout the image, even in the center. Red, Green, Blue or a combination of these colors can appear around objects. Longitudinal Chromatic Aberration can be dramatically reduced by stopping down the lens. Fast aperture prime lenses are typically much more prone to LoCA than slower lenses. 

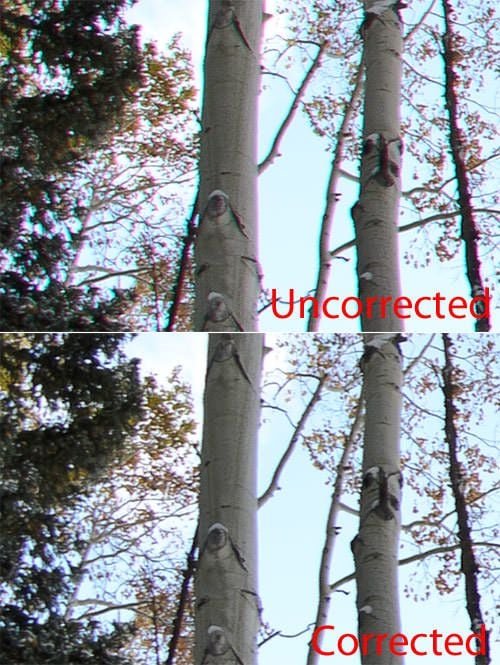
    The bottom crop was corrected in Lightroom’s “Lens Corrections” sub-module with a single click. The same can be done in Photoshop, but involves more steps (if not using the Camera RAW tool).

    Uncorrected-and-Corrected-CA

    Lateral Chromatic Aberration

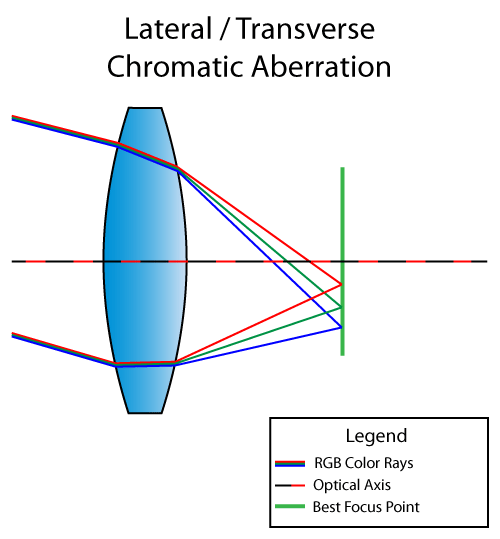
    Lateral Chromatic Aberration, also known as “transverse chromatic aberration”, occurs when different wavelengths of color coming at an angle focus at different positions along the same focal plane, as illustrated below:

    Lateral-Chromatic-Aberration

    Unlike LoCA, Lateral Chromatic Aberration never shows up in the center and is only visible towards the corners of the image in high-contrast areas. Blue and purple fringing is often common on some fisheye, wide-angle and low-quality lenses. Unlike Longitudinal Chromatic Aberration, Lateral Chromatic Aberration cannot be removed by stopping down the lens, but can be removed or reduced in post-processing software.


    Unfortunately, many lenses have both longitudinal and lateral chromatic aberrations present at the same time. The only way to reduce these aberrations, is to stop down the lens (to reduce LoCA) and then fix lateral CA in post-processing software like Lightroom and Photoshop.

    While many modern lens manufacturers employ specific techniques to reduce chromatic aberrations using achromatic/apochromatic optical designs and special extra-low dispersion elements, chromatic aberration is still an issue on most prime and zoom lenses that we just have to learn how to get around with.

    The good news is that many modern DSLRs incorporate special in-camera post-processing techniques to reduce and even eliminate lens chromatic aberrations and plenty of software packages are also capable of dealing with chromatic aberrations.


    Dealing with fringing
    More expensive lenses often suffer less from chromatic aberration – an example of where the adage, ‘you get what you pay for’ rings true. However, even if you can’t afford the very best lenses money can buy, all is not lost.

     GwxAePC7ajzSCc5drJCgx9-650-80

    Click the Lens Correction tab in Adobe Camera Raw to tackle chromatic aberration
    If you shoot raw files, Chromatic aberration can often be removed, or at least reduced, in post-processing software such as Abobe Lightroom, Adobe Camera Raw and DxO OpticsPro.

    The automatic detection and defringing process in Adobe Camera Raw is very quick and very effective, while using the manual sliders enables you to tackle more resilient purple and green halos that sometimes continue to cling to the edges of objects at the extreme edges of the picture.

    Extracts taken from : 

    https://photographylife.com/what-is-chromatic-aberration

    And

    https://www.techradar.com/news/the-a-to-z-of-photography-chromatic-aberration

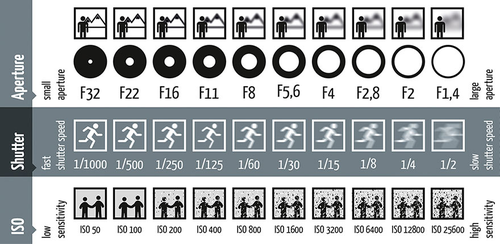
  2. Understanding how exposure works in a camera is possibly the most fundamental task you need to learn. The three elements of exposure are: 

    Shutter Speed, Aperture and ISO settings.

    Learn how they work together and you will be able to take control of what your images look like.

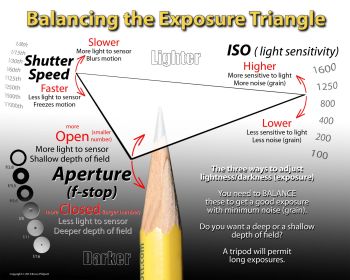
    exposure triangle

    Whether you want to make your subject the item of focus or capture the whole image, move the water around in the sea scape or freeze a waterfall, you will need to understand the basics of exposure.

    There are many variations and combinations of shutter speeds and F Stops and in the modern cameras you could just leave it to your camera, however using a manual setting will give you greater scope to get the effect you want. 

    The principles of film and digital photography work in exactly the same way. 

    ISO : Film comes in pre-set iso speeds, the iso determines the sensitiveness of the film emulsion to light, so the higher the iso the more sensitive the film is to lower levels of light and fast-moving objects, allowing for faster shutter speeds and smaller apertures.

    Digital iso works the same adjusting the sensitiveness of the camera sensor like putting a faster film in the camera.

    SHUTTER SPEED : This controls the speed that the shutter operates at, the slower the shutter speed, the more light is allowed onto the film or the sensor of the camera because of the time factor. The faster the shutter speed the easier it is to freeze the action of a fast-moving object for crisper images with no motion blurring at all.

    APERTURE : The aperture is an iris inside the camera lens, a series of leaves to form a circle which will get smaller or larger depending on the settings. Aperture works in F Stop numbers with the smallest number F-1.2 the greatest amount of light passing through the lens and the largest F Stop number on your lens, say F-22 will be the tiniest hole not letting much light through at all.

    The aperture of your lens works exactly the same way as the iris in your eye; in dark conditions the iris will open wide so you will have a larger pupil and in bright sun the pupil will appear really small so the iris has closed down so not letting much light in.

    To get the best from your photography we recommend using manual mode when you need total control over the exposure and depth of field. This will teach you how to be creative with your pictures. 

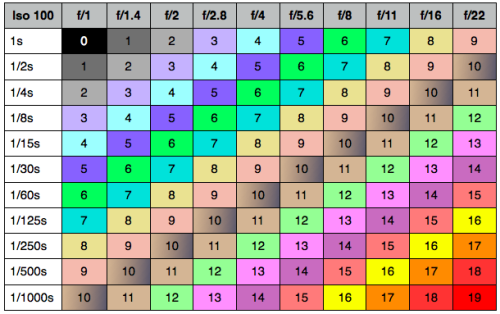
    Creating the correct exposure is about accuracy and compromise. If you increase the aperture you will need to slow down the shutter speed for example: a standard bright day at 100 iso might give an exposure of 125th sec @ F-8, to lower the depth of field to get the foreground sharp and the background out of focus you will need to open the aperture to a smaller value say F4. F stops work in doubling or halving the light depending in which direction you open or close the aperture on the lens. and shutter speeds work in the same way, this is why each shutter speed number is half or double the preceeding one. The chart below may help in understanding more.

    Exposure-Value-Chart-Iso-100

    For based on our example to get to F-4 from F-8 the exposure would adjust as follows:

    F-8 is our exposure @ 125th sec shutter speed.

    F-5.6 would need a 250th sec shutter speed.

    F4 would need a 500th sec shutter speed.


    For each stop on the aperture that you make an adjustment to open the lens, to keep the correct exposure ratio in you will need to double the shutter speed to keep the exposure value constant. The reverse would be the case if you were closing the aperture in the opposite direction.

    Remember the smaller the lens aperture the more depth of field you will have and the greater the chance of keeping your subject in the plane of focus.

    image

    Using a light meter is the most accurate way of defining the exposure for your photos, especially in manual mode. With todays modern technology there are many great and useful apps available for use with your smart phone so download a free light meter app and be absolutely accurate with the exposures.

    Correct operation of the meter will be covered in future articles but in the short-term, light is measured as an average. The best usage of your light meter is a 45 degree reading off a 50% grey card or if you do not have one then 45 degrees angle to the floor will give you the best average of reflective metering.

    Point the meter in the direction that you are taking the photograph and then at 45 degrees to the floor. This will not work with light surfaces like snow or sand but for any average surface, eg: grass, road, pavement, it will work perfectly accurately. We will cover correct use of the light meter in future articles.

    So in summary exposure is the key element to getting your photographs right, get the exposure accurate by using the right combination of ISO, Lens Aperture and Shutter Speed and you will have great exposure results.

    LOGO copy

  3. Photographic processing

    From Wikipedia, the free encyclopedia


    Photographic processing is the chemical means by which photographic film and paper is treated after photographic exposure to produce a negative or positiveimage. Photographic processing transforms the latent image into a visible image, makes this permanent and renders it insensitive to light.[1]

    All processes based upon the gelatin-silver process are similar, regardless of the film or paper's manufacturer. Exceptional variations include instant films such asPolaroid and thermally developed films. Kodachrome required Kodak's proprietary K-14 process. Kodachrome film production ceased in 2009, and K-14 processing is no longer available as of December 30, 2010.[2] Ilfochrome materials use the dye destruction process.


    Key stages in production of Ag-based photographs. Two silver halide particles, one of which is impinged with light (hν) resulting in the formation of a latent image (step 1). The latent image is amplified using photographic developers, converting the silver halide crystal to an opaque particle of silver metal (step 2). Finally, the remaining silver halide is removed by fixing (step 3).

    All film and paper is treated in a series of chemical baths, which are closely monitored and maintained at a specific temperature and treatment time. Developer baths are most sensitive to deviations from the standard time and temperature of treatment; other baths are less sensitive.

    Black and white negative processing

    1. The film may be soaked in water to swell the gelatin layer, facilitating the action of the subsequent chemical treatments.
    2. The developer converts the latent image to macroscopic particles of metallic silver.[3]
    3. stop bath, typically a dilute solution of acetic acid or citric acid, halts the action of the developer. A rinse with cleanwater may be substituted.
    4. The fixer makes the image permanent and light-resistant by dissolving remaining silver halide. A common fixer is hypo, specifically ammonium thiosulfate.[4]
    5. Washing in clean water removes any remaining fixer. Residual fixer can corrode the silver image, leading to discolouration, staining and fading.[citation needed]

    The washing time can be reduced and the fixer more completely removed if a hypo clearing agent is used after the fixer.

    1. Film may be rinsed in a dilute solution of a non-ionic wetting agent to assist uniform drying, which eliminates drying marks caused by hard water. (In very hard water areas, a pre-rinse in distilled water may be required - otherwise the final rinse wetting agent can cause residual ionic calcium on the film to drop out of solution, causing spotting on the negative.)
    2. Film is then dried in a dust-free environment, cut and placed into protective sleeves.

    Once the film is processed, it is then referred to as a negative. The negative may now be printed; the negative is placed in an enlarger and projected onto a sheet of photographic paper. Many different techniques can be used during the enlargement process. Two examples of enlargement techniques are dodging and burning.

    Alternatively (or as well), the negative may be scanned for digital printing or web viewing after adjustment, retouching, and/or manipulation.

     In modern automatic processing machines, the stop bath is replaced by mechanical squeegee or pinching rollers. These treatments remove much of the carried-over alkaline developer, and the acid, when used, neutralizes the alkalinity to reduce the contamination of the fixing bath with the developer.

    Black and white reversal processing

    This process has three additional stages:

    1. Following the stop bath, the film is bleached to remove the developed negative image. The film then contains a latent positive image formed from unexposed and undeveloped silver halide salts.
    2. The film is fogged, either chemically or by exposure to light.
    3. The remaining silver halide salts are developed in the second developer, converting them into a positive image.
    4. Finally, the film is fixed, washed, dried and cut.[5]

    Colour processing

    Chromogenic materials use dye couplers to form colour images. Modern colour negative film is developed with the C-41 process and colour negative print materials with the RA-4 process. These processes are very similar, with differences in the first chemical developer.

    The C-41 and RA-4 processes consist of the following steps:

    1. The colour developer develops the silver negative image, and byproducts activate the dye couplers to form the colour dyes in each emulsion layer.
    2. A rehalogenising bleach converts the developed silver image into silver halides.
    3. A fixer removes the silver salts.
    4. The film is washed, stabilised, dried and cut.[6]

    In the RA-4 process, the bleach and fix are combined. This is optional, and reduces the number of processing steps.[7]

    Transparency films, except Kodachrome, are developed using the E-6 process, which has the following stages:

    1. A black and white developer develops the silver in each image layer.
    2. Development is stopped with a rinse or a stop bath.
    3. The film is fogged in the reversal step.
    4. The fogged silver halides are developed and exhausted developing agents couple with the dye couplers in each layer.
    5. The film is bleached, fixed, stabilised and dried as described above.[6]

    In some old processes, the film emulsion was hardened during the process, typically before the bleach. Such a hardening bath often used aldehydes, such asformaldehyde and glutaraldehyde. In modern processing, these hardening steps are unnecessary because the film emulsion is sufficiently hardened to withstand the processing chemicals.

    Further processing

    Black and white emulsions both negative and positive, may be further processed. The image silver may be reacted with elements such as selenium or sulphur to increase image permanence and for aesthetic reasons. This process is known as toning.

    In selenium toning, the image silver is changed to silver selenide; in sepia toning, the image is converted to silver sulphide. These chemicals are more resistant to atmospheric oxidising agents than silver.

    If colour negative film is processed in conventional black and white developer, and fixed and then bleached with a bath containing hydrochloric acid and potassium dichromate solution, the resultant film, once exposed to light, can be redeveloped in colour developer to produce an unusual pastel colour effect.[citation needed]

    Processing apparatus

    Before processing, the film must be removed from the camera and from its cassette, spool or holder in a light-proof room or container.

    Small scale processing

    A cut-away illustration of a typical light-trap tank used in small scale developing.

    In amateur processing, the film is removed from the camera and wound onto a reel in complete darkness (usually inside adarkroom with the safelight turned off or a lightproof bag with arm holes). The reel holds the film in a spiral shape, with space between each successive loop so the chemicals may flow freely across the film's surfaces. The reel is placed in a specially designed light-proof tank (called daylight processing tank or a light-trap tank) where it is retained until final washing is complete.

    Sheet films can be processed in trays, in hangers (which are used in deep tanks), or rotary processing drums. Each sheet can be developed individually for special requirements. Stand development, long development in dilute developer without agitation, is occasionally used.

    Commercial processing

    In commercial processing, the film is removed automatically or by an operator handling the film in a light proof bag from which it is fed into the processing machine. The processing machinery is generally run on a continuous basis with films spliced together in a continuous line. All the processing steps are carried out within a single processing machine with automatically controlled time, temperature and solution replenishment rate. The film or prints emerge washed and dry and ready to be cut by hand. Some modern machines also cut films and prints automatically, sometimes resulting in negatives cut across the middle of the frame where the space between frames is very thin or the frame edge is indistinct, as in an image taken in low light.

  4. Photo processing has been interesting this year with very exciting news through the industry with film production starting again in Italy with Farrania and the UK with Kodak.

    PEOPLE HAVE THE POWER

    The main asset of FILM Ferrania are people. We cannot imagine such a delicate and magic product like film made by people without a close empathy with its preparation process. The film is something you have to produce in complete darkness, you need to have a sort of intimacy with it to obtain the excellence; no tool can do better than a team of people with over 30 years of experience who live close to the factory.


    We are really very proud to present our core R&D and production team: Corrado, Danilo, Renzo, Daniele, Ezio e Marco are the people who can realize the future of the  analog film.


    gruppo2-800.jpg


    As we as a company approach the end of another year we have seen a marked increase in business throughout the year with our customer base extending to most countries accross Europe, USA and The Far East.

    Our aim is to continue to provide traditional film processing services along side digital printing.

    Thank you to all of our customers new and existing and we look forwar to being of service throughout 2014.

  5. Taking pictures is a great hobby and is a lot of fun for you and your loved ones. But when times comes to develop photos that you have taken, things might get a little bit pricey. Photo processing is not as expensive as it was a decade ago, still, if you plan to keep your albums and scrapbooks full, you will need some advice. Here are some tips on how to keep your costs down without cutting back on any of the fun of photography.

    * Use overnight photo processing services instead of instant or one-hour ones. Even though it means waiting a bit long for those special shots you took at the party or on family holiday, it can significantly reduce the money you will have to spend to develop photos.


    * Be sure to pick only the best photos. Any good photo shop will refund you the costs of any dark, grainy or overexposed images. If you are not fully satisfied, demand your money back. There is no point in paying for low quality images when there are many more than you can invest in.


    * Develop photos in bulk. Many shops have special discounts in place for bulk purchases. There may even be seasonal offers and promotions, so be sure to keep your eyes open. Collect a few roles of film while you wait for a promotion or simply take advantage of bulk photo processing discount.


    * Stay away from the extra services. Most of these additional services are unnecessary, like buying a CD with your images. Go for services that you actually need and spend the saved money to develop photos you actually like.


    * Get a scanner. Once you develop photos and get your prints, you can use the scanner to keep a digital copy of your images. Many shops offer CD services with their photo processing, but the fees quickly add up so it is much wiser to invest into a one-off purchase of a scanner than paying recurring fees.


    * Buy a digital camera. A whole article can be written on the advantages of digital cameras over their film predecessors. But how will the digital camera save you money? First off, you will be able to sort out good images from the bad before you develop photos, without wasting money on the images that did not turn out good. Another benefit is to use online photo processing to develop photos. Many sites offer great discounts if you order your prints online. In addition, think of all the money you get to save on film. If you are a real photography enthusiast, you will probably get the value of your digital camera in one year already.


    * Try different shops. Many places will offer photo processing, with prices varying significantly. Some cheaper places will deliver poor quality, and some may provide value for money. Shop around and try out a few different services to determine where the quality and good prices meet. You just might be able to save more than you think.


    * Buy film in bulk. Watch out for discounts and bulk sales on film and buy it in advance. Most film packages can last for ages so you don't have to worry about expiration date. You will save money on your purchases and as an additional bonus you will always be equipped with enough film. There is nothing worse than running out of film before an important event or a trip.

  6. Slide processing, just like any photo film processing, is all about choosing the right chemicals at the correct temperature and the right amount of time. If any of these are mixed up, the result can be unpredictable. It is especially true when working with slide film. Generally, black and white film is less sensitive to temperature and length of time it is being treated with chemicals. Colour film, for example, will react to any changes much quicker.


    Now, a question that I hear get asked a lot is why do some many people prefer to use slide films and not print films. In reality, both of these film types have their advantages and disadvantages. You should choose which film fits your needs for the given occasion. Also, remember that slide processing is more challenging and not as straight forward as print film processing.


    Film quality has improved a lot in the past few years, which is very good news to both the amateurs and professional photographers alike. Grain has gotten much smaller and less noticeable, so there is less compromise on quality and speed for film cameras.

    So, why should you choose slide film?

    First of all, the image is actually positive. Meaning that after slide processing you get to see the actual image before it's even printed. Compared to the negatives, that don't give you a clear idea about the colours until you print your photos, positives allow you to see everything just as it was captured on the film. This, without a doubt, is really convenient. You can see straight away which areas of the image are over or under-exposed, for example. Any adjustments to the camera you make will be reflected on the image so it makes for an invaluable learning tool to experiment and play with the settings.


    Scanning images is another reason why positive slide image wins over a negative every time. When you need to remember the precise tone of some part of the photo, a positive will always display it "as is", whereas negative images might need a lot of guesswork on your part. Colour accuracy is definitely the reason to go with slide processing.


    Slides usually appear more contrasty and images seem more vibrant. It is thus no surprise why so many people prefer to work with slides rather than negatives. Once slide processing is done, your photos really come to life on the light table, making even the low contrast images stand out.


    Storing slides is easier as you do not need to have a print out to see what the actual image is. Negatives need to be provided with prints. That way, you can keep your slides in a box, no printed photos necessary. They take up less space and you can quickly find the image you are looking for. And if you don't think it's such an important thing, think about professionals who shoot thousand of photos. Keep all these negatives with prints would be very costly and demands a lot of space.


    In conclusion, if you think of becoming a photography professional, slides are definitely the way to go. Slide processing might seem daunting at first, but the benefits greatly outweigh the disadvantages. As a side note, many publications now do not accept negatives at all, showing the respect and demand for slide film in professional photo society.

  7. When it comes to digital cameras, one of the greatest benefits is digital photo processing. If you are new to digital photo printing, this guide will help you find your way around digital prints and how to choose the best service for your precious family moments or creative snaps.


    How to upload images for digital photo processing First stop – some tips on using online digital photo printing services. Many companies will provide you with a website address or even a software tool that allows you to easily upload your images. The layout and instructions usually are very easy to follow and within minutes your photos will be sent to the service provider. Aside from the speed and convenience it provides, it also has an additional benefit of security - your images will be stored on the company server and if you accidentally delete them from your camera and/or hard disk, you may still be able to recover them. Some companies even supply you with software than uploads your images to an online server as soon as you connect your camera, making the process run in the background with no input or hassle. When you are ready to get your digital prints, you simply log on to your account and choose the photos you want to print, along with other options such as size, number of copies and finish. At this stage you can also upload some additional photos if you wish. Keep in mind - most services offer bulk discounts, so it's better to have all your digital prints done in one go.


    How to edit images before ordering digital prints

    There is nothing worse than having a beautiful photo spoiled by the dreaded "red eye" effect. Back in the day that would doom the image to the furthest reaches of the photo album. Luckily nowadays it is no longer a concern as most digital cameras have a way of eliminating this effect. However, if the read eyes do occur, it can be dealt with easily and quickly. Good digital photo processing companies will provide you with free tools for simple photo editing, such as cropping, red eye removal, colour balance change etc. Be sure to check with your provider if it is something they can do for you, as it will greatly enhance the quality of your digital prints. The easiest way to make these alterations is via online tools that save you from the hassle of downloading and installing additional software. You can make all the necessary adjustments straight from your user account, where you see all your uploaded photo ready to be printed. Now you can do simple enhancement and design tasks yourself without turning to pricey photo editing services.


    There are numerous digital photo printing companies out there. Many will offer you free sample prints for you to choose their service based on quality. Be sure to inquiry about any samples before ordering your digital prints. Sometimes the images will not appear the same as they do on your monitor or phone screen, so you must check that you are happy with he colours and resolution.


    Least but not least, delivery charges and delivery options also need to be taken into account. You need to make sure that there are no excessive shipment costs and that your digital prints will be delivered to you promptly and safely, without them being damaged or even lost along the way.