Snaps Photos Top Tips for Better Photographs - Exposure
Posted on
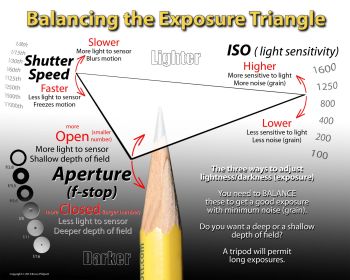
Understanding how exposure works in a camera is possibly the most fundamental task you need to learn. The three elements of exposure are:
Shutter Speed, Aperture and ISO settings.
Learn how they work together and you will be able to take control of what your images look like.

Whether you want to make your subject the item of focus or capture the whole image, move the water around in the sea scape or freeze a waterfall, you will need to understand the basics of exposure.
There are many variations and combinations of shutter speeds and F Stops and in the modern cameras you could just leave it to your camera, however using a manual setting will give you greater scope to get the effect you want.
The principles of film and digital photography work in exactly the same way.
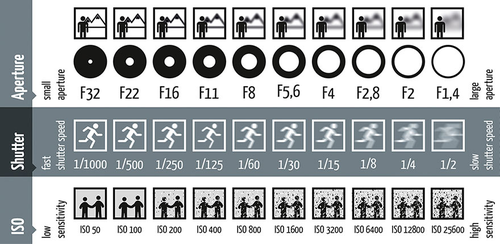
ISO : Film comes in pre-set iso speeds, the iso determines the sensitiveness of the film emulsion to light, so the higher the iso the more sensitive the film is to lower levels of light and fast-moving objects, allowing for faster shutter speeds and smaller apertures.
Digital iso works the same adjusting the sensitiveness of the camera sensor like putting a faster film in the camera.
SHUTTER SPEED : This controls the speed that the shutter operates at, the slower the shutter speed, the more light is allowed onto the film or the sensor of the camera because of the time factor. The faster the shutter speed the easier it is to freeze the action of a fast-moving object for crisper images with no motion blurring at all.
APERTURE : The aperture is an iris inside the camera lens, a series of leaves to form a circle which will get smaller or larger depending on the settings. Aperture works in F Stop numbers with the smallest number F-1.2 the greatest amount of light passing through the lens and the largest F Stop number on your lens, say F-22 will be the tiniest hole not letting much light through at all.
The aperture of your lens works exactly the same way as the iris in your eye; in dark conditions the iris will open wide so you will have a larger pupil and in bright sun the pupil will appear really small so the iris has closed down so not letting much light in.
To get the best from your photography we recommend using manual mode when you need total control over the exposure and depth of field. This will teach you how to be creative with your pictures.
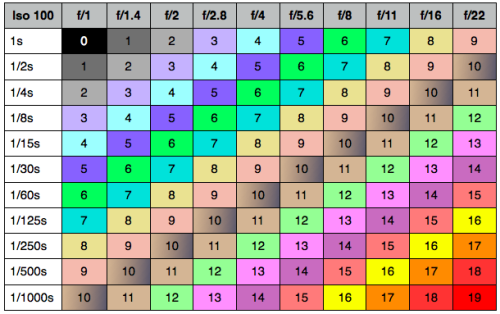
Creating the correct exposure is about accuracy and compromise. If you increase the aperture you will need to slow down the shutter speed for example: a standard bright day at 100 iso might give an exposure of 125th sec @ F-8, to lower the depth of field to get the foreground sharp and the background out of focus you will need to open the aperture to a smaller value say F4. F stops work in doubling or halving the light depending in which direction you open or close the aperture on the lens. and shutter speeds work in the same way, this is why each shutter speed number is half or double the preceeding one. The chart below may help in understanding more.

For based on our example to get to F-4 from F-8 the exposure would adjust as follows:
F-8 is our exposure @ 125th sec shutter speed.
F-5.6 would need a 250th sec shutter speed.
F4 would need a 500th sec shutter speed.
For each stop on the aperture that you make an adjustment to open the lens, to keep the correct exposure ratio in you will need to double the shutter speed to keep the exposure value constant. The reverse would be the case if you were closing the aperture in the opposite direction.
Remember the smaller the lens aperture the more depth of field you will have and the greater the chance of keeping your subject in the plane of focus.

Using a light meter is the most accurate way of defining the exposure for your photos, especially in manual mode. With todays modern technology there are many great and useful apps available for use with your smart phone so download a free light meter app and be absolutely accurate with the exposures.
Correct operation of the meter will be covered in future articles but in the short-term, light is measured as an average. The best usage of your light meter is a 45 degree reading off a 50% grey card or if you do not have one then 45 degrees angle to the floor will give you the best average of reflective metering.
Point the meter in the direction that you are taking the photograph and then at 45 degrees to the floor. This will not work with light surfaces like snow or sand but for any average surface, eg: grass, road, pavement, it will work perfectly accurately. We will cover correct use of the light meter in future articles.
So in summary exposure is the key element to getting your photographs right, get the exposure accurate by using the right combination of ISO, Lens Aperture and Shutter Speed and you will have great exposure results.

Add a comment: